Are you tired of struggling to paint your trim without making a mess? Do you dread the thought of having to use painter's tape to get those clean edges? Look no further! The short answer to your painting woes is the right brush. In this article, we will explore the best brush to paint trim and why it's crucial to invest in a quality brush. From achieving those straight lines to getting a smooth finish, we've got you covered. So, put down that roll of tape and keep reading to discover the brush that will make your trim painting experience a breeze!
How did we decide on the best brush to paint trim?
Painting trim can be a real pain. You need the right brush to make it go quickly and smoothly.
It can be so frustrating when you finally get around to painting your trim and realize you don't have the right brush. Suddenly the job seems impossible.
Not to worry! We did all of the hard work for you. Below are the best brushes to paint trim, as chosen by Amazon customers. With one of these brushes, you'll be able to finish the job in no time.
Best brush to paint trim
Best brush to paint trim
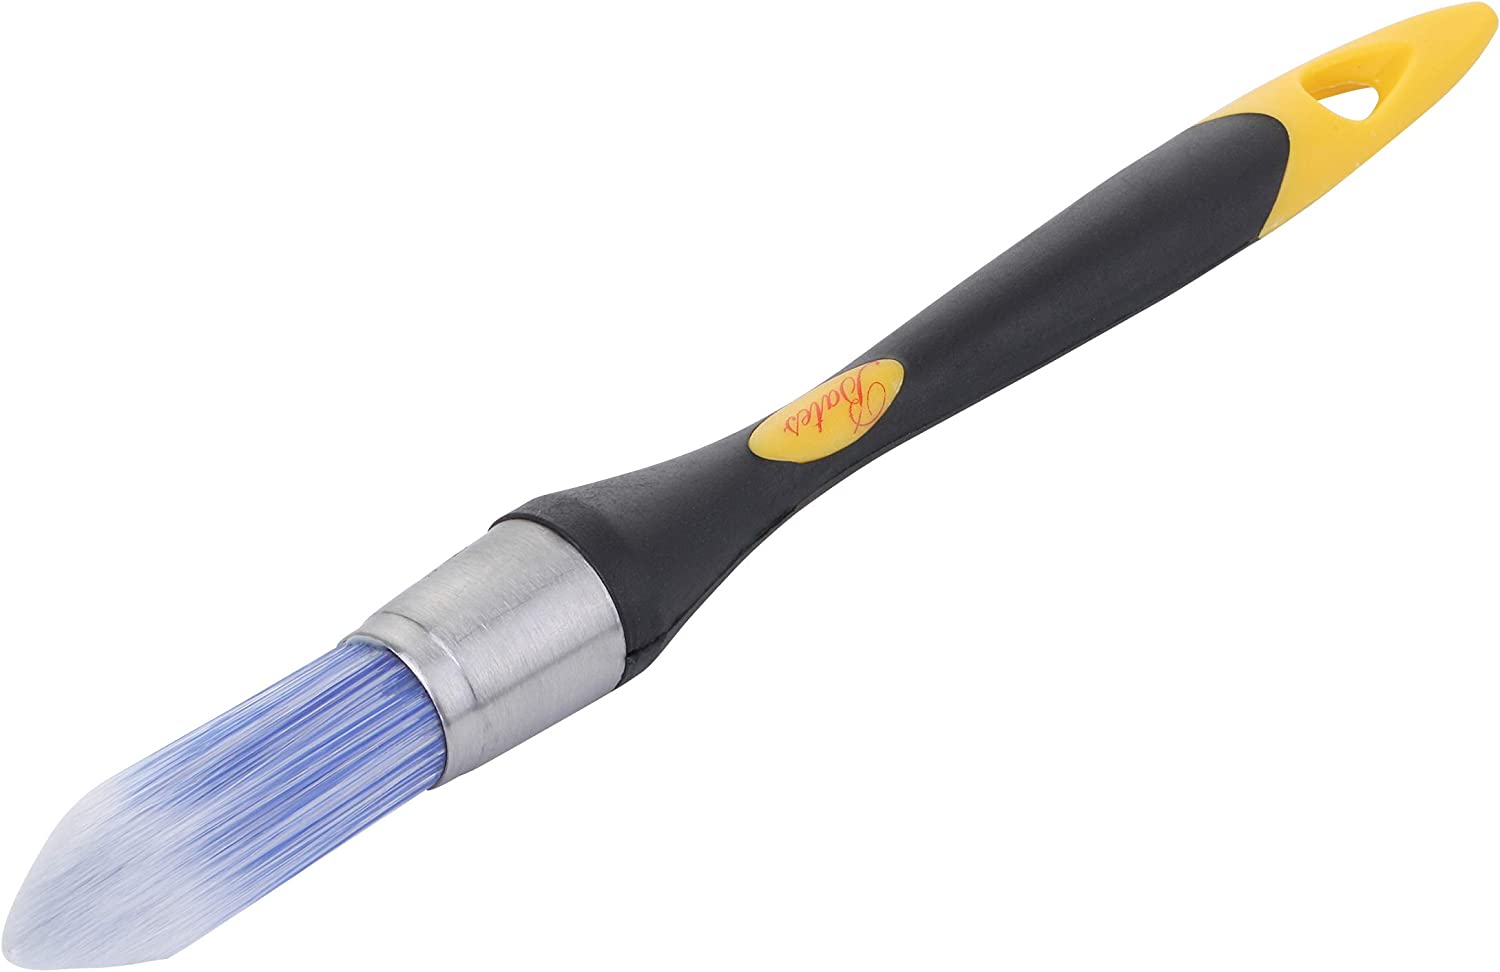
Bates- Trim Brush, 0.75 Inch, Edge Painting Tool, Trim Paint Brushes, Trim Painting Tool, Paint Trimmer Edger, Trim Brush
Why We Like It
Are you in the market for an easy-to-use, low-cost edge painting tool that will do the job right every time? Look no further than the Bates Trim Brush 0.75 inch! This premium trim paint brush is one of Amazon's bestsellers and highly reviewed by satisfied customers who were able to complete their DIY project with ease.
You'll be happy to know that the Bates Trim Brush has been designed with your comfort in mind. Not only is it a breeze to hold, but its plastic handle ensures your hand won't tire from hours of painting. And if you're concerned about messes, this brush is easy to clean too!
You'll also find that the Bates Trim Brush gives you great value for your money and provides reliable performance each time. Whether you need an edge painter for a room in your home or for work duties, this tool will help get the job done quickly and correctly—allowing you more time for other activities. With its convenience, quality and affordable price tag, don't let this opportunity pass you by – order the Bates Trim Brush today!
What You Should Be Aware of Before buying?
Looking to spruce up the trim on your home windows, paint some detail work or perfect around the edges of your new shutter? Look no further than the Bates- Trim Brush! This 0.75 inch tool is made for all sorts of edge painting, and its angled brush head helps you to reach even the most difficult places. Perfect for trim painting and edging, it’s great for professional painters and passionate do-it-yourselfers alike. The long handle of this brush allows you to manage tight angles while ensuring confidence as you paint along with a nice even finish. Best of all, with proper care this trim brush can be used over and over again! So don’t delay - add one of these tools to your arsenal and get ready to experience true painting convenience in reaching those hard-to-reach spots.
Best Paint brush for exterior trim
Best Paint brush for exterior trim
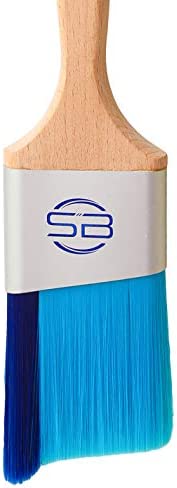
Stinger Brush Pro - Professional Exterior Paint Brush with Fill-A-Blend Technology, Angle Brush for Cutting in, Edges, Trim, and Walls (1, 2.5 Inch - Stinger Pro)
Why We Like It
Welcome to the world of professional painting with the Stinger Brush Pro! Our top-selling exterior paint brush is ideal for any DIY home improvement project. With this brush, you won’t need to be a professional painter or have expensive machinery. You can simply pick up one of these brushes and get started.
The Stinger Brush Pro is perfect for those who need accuracy and speed – the extra large 3 inch brush head covers more space quickly and accurately, so you can finish the job faster. Plus, it comes with an ergonomic design that's comfortable to hold for long periods of time.
You don't need to worry about overspending when you use this product either – our fan-favorite Stinger Brush Pro delivers incredible value for money. And if that’s not enough, it’s also incredibly easy to clean up after you're done – no tedious scrubbing required!
Your next painting project is only a few clicks away with the Stinger Brush Pro. Professional quality results don’t have to come at a high cost – just try one today and see why customers rave about the incredible value and convenience that comes when they use this powerful tool!
What You Should Be Aware of Before buying?
The Stinger Brush Pro is perfect for tackling those intricate and detailed exterior painting jobs. It features Fill-A-Blend technology that helps you achieve an even and uniform coverage on every wall, trim or edge you paint. Plus, it comes in two sizes - 1 inch and 2.5 inches - making it versatile for all of your painting projects! The angle brush design of the Stinger Brush Pro provides maximum control and precision to help you get those hard to reach corners and edges just right. So if you’re looking for a reliable professional brush that will make your next painting job look like a pro did it, then the Stinger Brush Pro is your ideal choice!
Best brush to paint window trim
Best brush to paint window trim
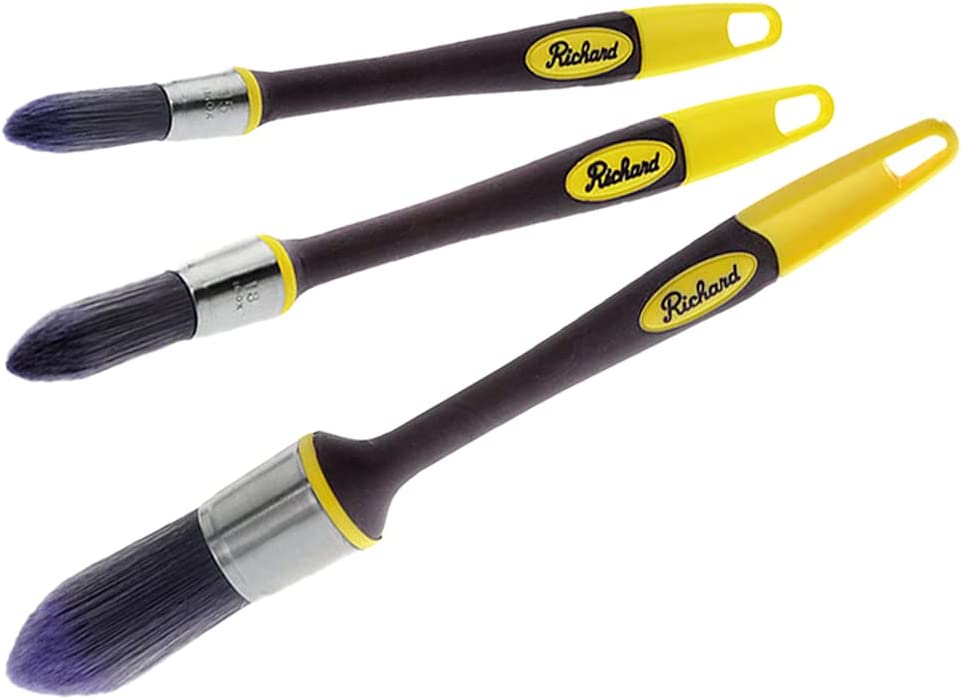
Richard 13400 5/8", 3/4" and 1" Elegance Trim Paint Brush, 3 Pack. Edge Painting Tool, Trim Painting Tool, Cutting-in Tool for Windows and Ceilings. No-Shed, bristles.
Why We Like It
Introducing the Richard 13400 5/8", 3/4" and 1" Elegance Trim Paint Brush! Our best-selling paint brush is designed to help you take your painting projects to a whole new level. With its easy-to-clean, easy-to-hold design and high value, it's no wonder that this paint brush is one of the top sellers on Amazon!
Whether you're tackling a big DIY project or just adding some subtle touches to brighten up your home, this brush will make the job an easy one. Its special design allows for precise application along all edges—it even works wonders on doors, windows, tiles and more. Just dip into your favorite paint and start creating a masterpiece!
Not only does the Richard 13400 make edge painting a breeze, but it's also incredibly convenient when it comes to cleaning. Just wipe off any excess paint with a cloth or sponge and store away for next time! The durable material ensures that you'll be able to use this brush again and again without compromising on quality.
Save time and money with the Richard 13400 5/8", 3/4" and 1" Elegance Trim Paint Brush—you won't regret it! Get yours today and transform your house in no time.
What You Should Be Aware of Before buying?
The Richard 13400 Elegance Trim Brushes are the perfect set for any painting project! The three-pack comes with 5/8", 3/4" and 1" brushes for those hard to reach places, perfect for cutting in around windows and ceilings to get that pro-style finish. With no-shed bristles, you can rest easy knowing that you won’t have to endlessly clean up a mess of loose hairs. Get your hands on this amazing trio today and make trim painting easier than ever before!
Best brush to paint trim Frequently Asked Questions - FAQs
Is it better to paint trim with a roller or brush?
When it comes to painting trim, the best brush to use is like a superhero for your project! While a roller is great for smooth finishes on walls, a brush is the real MVP for trim. It ensures that you don't end up with unsightly brush marks on your beautiful walls. Plus, it gets the job done faster, giving you more time to enjoy the results. But wait, there's more! The best brush for trim is a rigger brush. Made from long, slender sable or synthetic hairs, this brush creates those perfect straight lines that make your trim pop. So, grab your trusty rigger brush and let the painting magic begin!
What kind of brush do you use to paint baseboards?
When it comes to painting trim, my friend, a brush is like a superhero for the project! While a roller is great for smooth finishes on walls, a brush is the real MVP for trim. It prevents unsightly brush marks on the walls and gets the job done faster. But not just any brush will do. To create perfect straight lines that make the trim pop, I recommend using a trusty rigger brush. Made from long, slender sable or synthetic hairs, this brush is the secret weapon for precise painting in tight corners and edges. So, grab your rigger brush and let the painting magic begin!
How do you prevent brush marks when painting trim?
To prevent those pesky brush marks when painting trim, it's all about finding the best brush for the job. And the winner is... drumroll the rigger brush! This magical tool, made from long, slender sable or synthetic hairs, is perfect for precise painting in tight corners and edges. Hold your brush at a slight angle and gently swipe it across the surface, avoiding straight-on application. Not only will this technique help you dodge those brush marks, but it'll also get the job done faster. So, grab your rigger brush and let the painting magic begin!
What is the best way to paint trim?
When it comes to painting trim, you want to make sure you have the right brush for the job. And the best brush to paint trim is none other than the rigger brush! This little wonder is perfect for creating straight lines and precise painting in those tight corners and edges. Its long, thin bristles allow for controlled strokes and effortless maneuvering. To prevent brush marks when painting trim, try holding the rigger brush at a slight angle and swiping it across the surface instead of applying it straight-on. This technique not only helps you avoid those pesky brush marks but also makes the job faster. So grab your rigger brush and get ready to transform your trim with ease!
How do professional painters paint trim?
When it comes to painting trim like a pro, the secret lies in the brush you use. And the best brush for the job? Drumroll, please! It's none other than the trusty rigger brush. Made from long, slender sable or synthetic hairs, this magical tool is perfect for precise painting in those tight corners and edges. Just hold the brush at a slight angle, and with a flick of the wrist, swipe it across the surface. Voila! No more pesky brush marks. So, grab your rigger brush, unleash your inner Picasso, and paint that trim flawlessly!
What is the general rule for painting trim work?
The general rule is to use the same paint color as the walls, but with a glossier finish. This will help the trim work to "pop" and look more polished. If you want to use a different color for the trim work, it's best to go with a light or neutral color that will complement the wall color without competing with it.
Do you need 2 coats of paint on trim?
It depends on the paint. Some paints are formulated to cover in one coat, while others may require two coats for full coverage. If you're unsure, it's always best to err on the side of caution and apply a second coat just to be safe.
Is it faster to paint trim first or walls?
There is no definitive answer to this question as it depends on a number of factors, such as the type of paint, the size and shape of the trim, and the condition of the walls. In general, though, it is usually faster to paint the trim first. This is because it is easier to get into tight spaces and around corners when painting trim than when painting walls. However, if the walls are in poor condition or if there is a lot of trim work to be done, then it may be faster to paint the walls first.
Do you paint trim first or second?
Second. Painting the trim last allows you to better see how the walls and ceiling are coming together. It's also easier to paint around trim than to paint trim around walls.
How do you paint white trim like a pro?
There are a few key things to keep in mind when painting white trim like a pro:
1. Prime the trim first with a good primer. This will help the paint brushes for trim adhere better and will ensure that the trim doesn't yellow over time.
2. Use a high-quality paint, such as an oil-based paint, for the best results. Latex paints can sometimes chip and peel over time, whereas oil-based paints will generally last longer.
3. Paint in thin layers, allowing each layer to dry completely before applying the next one. This will help avoid streaks and make the finish smoother.
4. Finish up by applying a coat of clear sealant to protect the paint job from fading and
How do you paint trim fast?
There are a few different ways to paint trim quickly. One is to use a trim brush, which is designed for painting tight spaces and has short bristles that allow you to get into hard-to-reach areas. Another option is to use a paint sprayer, which will cover large areas quickly. And finally, if you're working on a small project, you can also use a foam brush – it won't provide quite as good of coverage as a traditional brush, natural bristle brushes but it will be faster and easier to use.
Whatever method you choose, make sure to properly prepare the surface before painting by cleaning it and removing any dust or dirt. Also, be sure to apply primer if the trim is made from a different
Is one coat of paint enough for trim?
It depends on the paint and the trim. A satin or semigloss paint is usually sufficient, but if you're using a matte or eggshell paint, you may need two coats. If the trim is made of a dark wood or other dense material, one coat may not be enough. Always do a test patch first to see how the paint looks and whether it covers well.
Can you paint trim without taping?
Yes, you can paint trim without taping. Some people find that it's helpful to use blue painter's tape to create a straight line for the edge of the trim, but it's not necessary.
If you're careful and use a steady hand, you can paint the trim around windows and doors without any problems. Make sure to use a brush with stiff bristles so that you can get into all the nooks and crannies. And be sure to clean your brushes when you're finished so they don't get hardened and difficult to use the next time around.
Where do you stop painting trim?
You stop painting trim when you've completed the room.
Paint the trim using paint brush for trim around the entire room, making sure to brush into all of the corners and crevices. When you've finished painting the trim, allow it to dry completely before moving on to the next step.
How long should you wait between coats of paint on trim?
You should wait at least 24 hours between coats of paint on trim to avoid the formation of bubbles.
If you apply a second coat before the first coat has dried completely, you may get bubbles in the paint. To avoid this, make sure you wait at least 24 hours between coats. In some cases, you may need to wait even longer if the paint is thick or if it's cold and damp outside.
Can you cut in and paint the next day?
Yes, you can cut in and paint the next day. You just have to make sure that the surface is completely dry before applying any paint. If you're working on a large surface, it might take a few days for it to dry completely. You can speed up the process by using a fan or blowing on it with a hair dryer.
Is it better to paint at night or day?
There is no definitive answer to this question. Some artists prefer to paint at night because they find that there is less distraction and they are able to focus more easily. Other artists prefer to paint during the day because they find that natural light provides better illumination for their work. Ultimately, it is up to the individual artist to decide what time of day works best for them.
What should you not do after a paint job?
You should not do anything that will disturb the paint job for at least 48 hours. The paint needs time to cure in order to form a hard, protective surface.
If you have to move any furniture, use cardboard or plastic film to protect the new paint job. DO NOT USE GLOVES to move furniture; your fingerprints will leave Permanent Marks on the paint.
Do you always need 2 coats of paint?
It depends on the paint. Most paints will cover adequately in one coat, but it's always a good idea to apply a second coat to ensure even coverage and to avoid any visible brush strokes. Two coats of paint will also help to seal the surface and protect it from fading and dirt buildup.
For new surfaces, it's always best to start with two coats of primer before applying your chosen paint color. This will help to create an even surface for the paint to adhere to, and will give you a more consistent finish overall.
Do you paint corners or walls first?
It depends on the paint and the painting method. For latex paint, it is usually best to start with the corners and then work your way out. For oil-based paint, you would start with the walls and then do the corners last.
There are different schools of thought on this topic, so it's always best to consult a professional painter if you're not sure which method to use.
Should I wet my paint roller before painting?
Yes, you should wet your paint roller before painting. When the roller is wet, the paint will go on the wall more smoothly and it will be less likely to drip.
Should you clean paint brushes in the sink?
You should not clean paint brushes in the sink.
Paint contains chemicals that can be harmful to both you and the environment. When these chemicals come into contact with water and other materials in your sink, they can contaminate your water supply and damage the environment.
It is best to clean paint brushes outdoors using a brush cleaner or mineral spirits. This will help protect both you and the environment from the harmful effects of paint chemicals.
How do you make crisp lines when painting?
There's no one definitive answer to this question because it depends on the type of paint you're using and the particular technique you're employing. However, here are a few tips that might help:
1. Use a good quality paintbrush with stiff bristles.
2. If you're using acrylics or oils, use a palette knife to mix your colors and then apply them to your painting surface.
3. Load your brush with as much paint as possible before making your marks - this will give you thicker lines.
4. Don't overload your brush with too much paint or it will start to drip and bleed.
5. Use short, quick strokes for the crispest lines possible.
How do I get a perfect line between my wall and ceiling?
There are a few different ways to get a perfect line between your wall and ceiling. You can use a level, a chalk line, or a laser level.
If you're using a level, make sure the bubble is in the middle of the tube. Mark where the level is pointing on both the wall and the ceiling with a pencil. Then use a straight edge to connect the marks on each surface.
If you're using a chalk line, snap it so that it's tight against the wall and ceiling. Hold one end against the wall and pull it towards you until it touches the ceiling; then let go of the end so that it snaps back into place. It will leave a chalk line between the wall
When should I not paint?
There are generally two times when you should not paint: before the paint has dried and while there is still wet more paint on the surface.
If you try to apply a second coat of paint using best paint brushes before the first coat has dried, it will not stick to the surface and will end up looking streaky. In addition, if there is still wet paint on the surface, it can be easily smudged or blurred. So wait until the first coat of paint has completely dried before applying a second coat - this usually takes around four hours.
Is it OK to paint one wall at a time?
Yes, it is generally OK to paint one wall at a time. However, it is important to be aware of the order in which you are painting the walls. If you are using a gloss or semigloss paint, for example, you should always paint the trim and ceiling first, then the walls. If you start with the walls and then paint the trim and ceiling, the trim and ceiling will be covered in paint specks.
How do you fix messy paint edges?
To fix messy paint edges, use a brush or sponge to dab on a thin coat of the same color paint directly over the edge of the paint that is already dry.
If you have to do some touch-up painting, make sure that the new color is blended in well with the old color. A good way to do this is to use a brush to blend the new color into the old color in gentle circular motions.
Can you sleep in a room you painted that day?
Yes, you can sleep in a room you painted that day.
The fumes from the paint will dissipate within a few hours, so you don't have to worry about them harming you while you're asleep. However, it's always a good idea to open a window or door to let fresh air circulate through the room. This will help the fumes disperse more quickly and will also make your room smell fresher.
How do you paint corners without tape?
One way to paint corners without tape is to use a brush that has a narrow edge. Another option is to cut the tip off of a regular paintbrush so that it has a sharp corner. Either way, make sure to load the brush with paint before starting to paint the corner.
To avoid spilling paint on the wall, try to keep your hand steady as you paint and be careful not to overload the brush with too much paint. Take your time and go slowly when painting corners, so that you have a chance to adjust if necessary. If you do make a mistake, wait for the paint to dry before fixing it.
Should you caulk before or after you paint?
There is no definitive answer to this question. Some people believe that you should caulk before you paint, in order to create a smooth surface for the paint to adhere to. Others believe that you should wait until after you have painted, in order to avoid bubbles and other imperfections. Ultimately, it is up to the individual homeowner to decide which method works best for them.
How long after a room is painted can you sleep in it?
It's generally recommended to wait at least 48 hours before sleeping in a newly painted room, as fumes and vapors can irritate the eyes, nose, and throat.
Conclusion
When choosing a trim brush there are many factors to consider such as the type of bristles, handle and width. After reading this guide, you should feel confident in your ability to select the best trim brush for your needs. If you're ready to start shopping, click here for our top pick or here for our budget-friendly option. As always, thanks for reading!